This article will cover the steps necessary to clone a virtual machine (VM) on VirtualBox.
I am a PHP developer and use virtual machines running Linux for development and testing.
My configuration consists of a Windows 10 laptop with VirtualBox running on it. VirtualBox is virtualization software that allows one the ability to add guest virtual machines (VMs).
In my case, I use this configuration to build website hosting configurations. I create these web hosting servers using Linux, Apache, MySQL, and PHP (LAMP).
I start by creating a Ubuntu 24.04LTS server as a VM on VirtualBox. Then I create a LAMP setup as a VM and then clone it for a project.
LAMP stands for Linux, Apache, MySQL, and PHP.
There are 7 steps to create a clone.
Step 1 is to stop the VM to be cloned, if it is running.
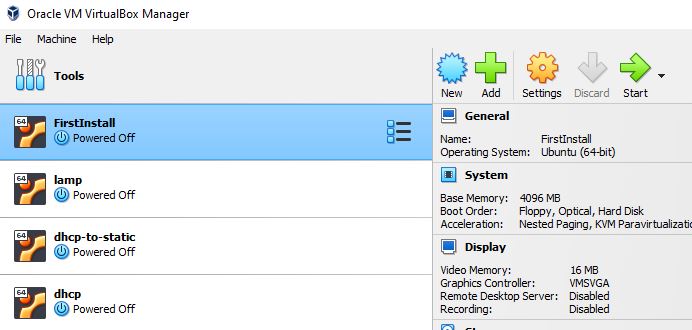
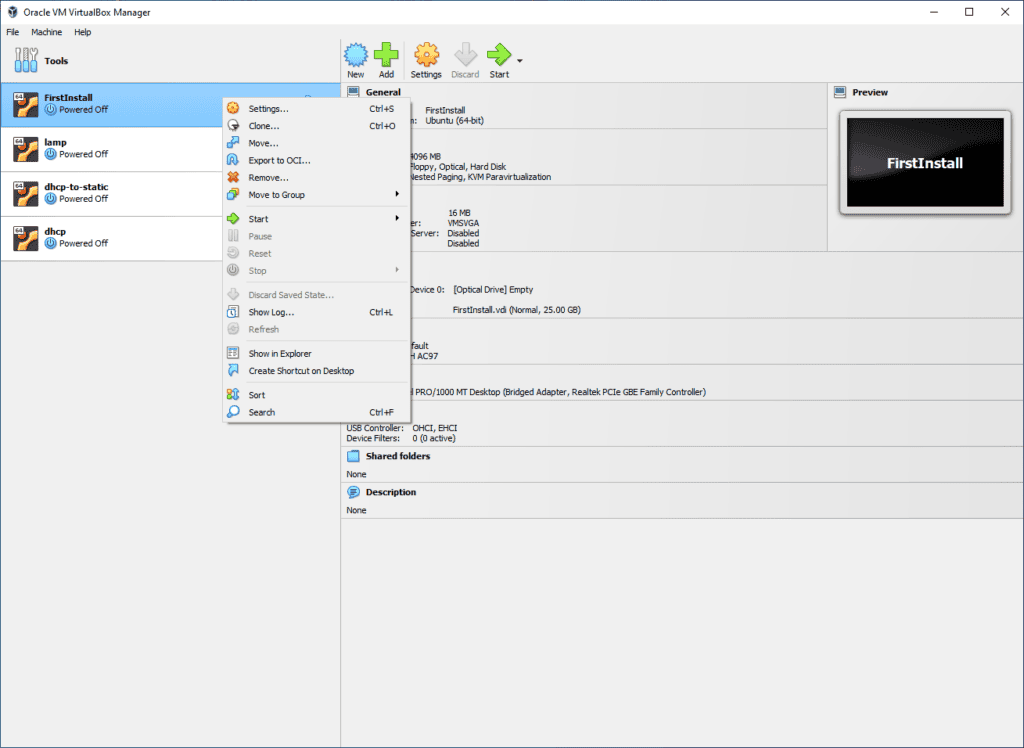
Step 2 Right mouse click on the VM to be cloned

Step 3 Click on Clone from the drop-down menu
Step 4 Give the clone a name. Fill in the path. And in the MAC address policy drop-down select “Generate new MAC address for all network adapters”. For the clone to be a viable server on your network it needs a different MAC address from the server that is being cloned. The clone will also need a different IP address from the server that is being cloned.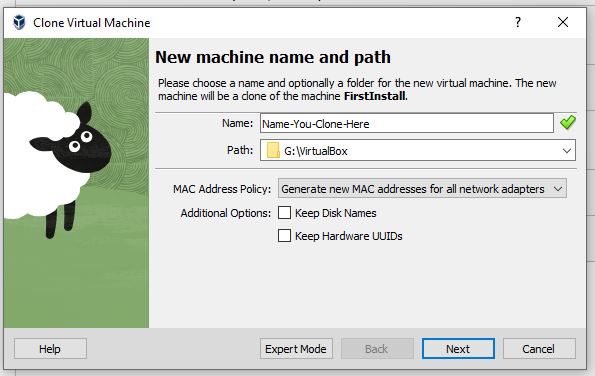
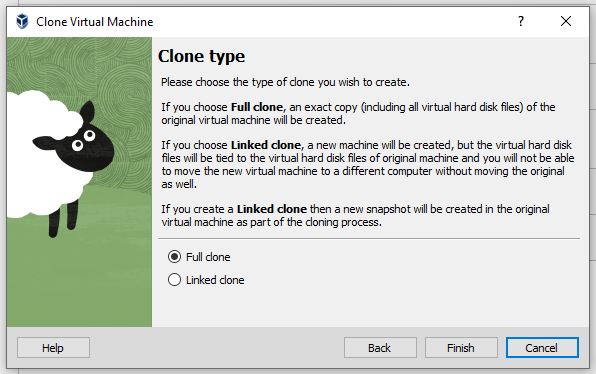
Step 5 Select Full clone for “Clone type” as full.
How to Determine What IP Address Your Server is Using
If you are using VirtualBox, once the VM is activated, you will have the opportunity to log in. Once logged in you can use the commands “ip a” and/or ifconfig”. Both provide the same information.
Ifconfig was not available on my server so I had to install it by installing “net-tools”.
To install net-tools issue the command:
sudo apt install net-tools
After installing net-tools you will be able to issue the command ifconfig.
The output from ifconfig:
enp0s3: flags=4163<UP,BROADCAST,RUNNING,MULTICAST>  mtu 1500
        inet 192.168.1.80  netmask 255.255.255.0  broadcast 192.168.1.255
        inet6 fe80::a00:27ff:fe9a:8638  prefixlen 64  scopeid 0x20<link>
        ether 08:00:27:9a:86:38  txqueuelen 1000  (Ethernet)
        RX packets 2461  bytes 2039625 (2.0 MB)
        RX errors 0  dropped 0  overruns 0  frame 0
        TX packets 700  bytes 92619 (92.6 KB)
        TX errors 0  dropped 0 overruns 0  carrier 0  collisions 0

lo: flags=73<UP,LOOPBACK,RUNNING>  mtu 65536
        inet 127.0.0.1  netmask 255.0.0.0
        inet6 ::1  prefixlen 128  scopeid 0x10<host>
        loop  txqueuelen 1000  (Local Loopback)
        RX packets 114  bytes 9992 (9.9 KB)
        RX errors 0  dropped 0  overruns 0  frame 0
        TX packets 114  bytes 9992 (9.9 KB)
        TX errors 0  dropped 0 overruns 0  carrier 0  collisions 0
The output from ip a :
1: lo: <LOOPBACK,UP,LOWER_UP> mtu 65536 qdisc noqueue state UNKNOWN group default qlen 1000
    link/loopback 00:00:00:00:00:00 brd 00:00:00:00:00:00
    inet 127.0.0.1/8 scope host lo
       valid_lft forever preferred_lft forever
    inet6 ::1/128 scope host noprefixroute
       valid_lft forever preferred_lft forever
2: enp0s3: <BROADCAST,MULTICAST,UP,LOWER_UP> mtu 1500 qdisc pfifo_fast state UP group default qlen 1000
    link/ether 08:00:27:9a:86:38 brd ff:ff:ff:ff:ff:ff
    inet 192.168.1.80/24 brd 192.168.1.255 scope global enp0s3
       valid_lft forever preferred_lft forever
    inet6 fe80::a00:27ff:fe9a:8638/64 scope link
       valid_lft forever preferred_lft forever
This output gives us the same information.
An Example of a Dynamic (DHCP) IP Address Configuration
Log into your server.
Issue the following command: “cd /etc/netplan” and press the enter key.
Then issue the command “vdir” and press the enter key.
There should be a file that end in .yaml in that directory.
Mine is : 50-cloud-init.yaml
At that point enter “sudo vi 50-cloud-init.yaml”. Make sure you use your file’s name in place of mine.
Sudo allows you to become the root user/superuser. Vi is my Linux command line editor of choice.
At this point, the configuration file will be opened in vi.
Your file should look very similar to the following:
# This file is generated from information provided by the datasource.  Changes
# to it will not persist across an instance reboot.  To disable cloud-init's
# network configuration capabilities, write a file
# /etc/cloud/cloud.cfg.d/99-disable-network-config.cfg with the following:
# network: {config: disabled}
network:
    ethernets:
        enp0s3:
            dhcp4: true
    version: 2
If your file looks like this one your network is configured for dynamic IP allocation or Dynamic Host Configuration Protocol (DHCP). This means you will need to read and follow this article: https://phpcoderusa.com/how-to-change-ip-address-from-dhcp-to-static-in-ubuntu/
An Example of a Static IP Address Configuration
Log into your server.
Issue the following command: “cd /etc/netplan” and press the enter key.
Then issue the command “vdir” and press the enter key.
There should be a file that end in .yaml in that directory.
Mine is: 50-cloud-init.yaml
At that point enter “sudo vi 50-cloud-init.yaml”. Make sure you use your file’s name in place of mine.
Sudo allows you to become the root user/superuser. Vi is my Linux command line editor of choice.
At this point, the configuration file will be opened in vi.
Your file should look very similar to the following:
# This file is generated from information provided by the datasource.  Changes
# to it will not persist across an instance reboot.  To disable cloud-init's
# network configuration capabilities, write a file
# /etc/cloud/cloud.cfg.d/99-disable-network-config.cfg with the following:
# network: {config: disabled}
network:
    ethernets:
        enp0s3:
            addresses:
            - 192.168.1.80/24
            nameservers:
                addresses:
                - 8.8.8.8
                - 8.8.4.4
                search: []
            routes:
            -   to: default
                via: 192.168.1.1
    version: 2
This is the configuration for a static IP address.
Backup Current Network Configuration before Starting
Backing up your configuration files before changing them is a good habit to get into.
This is easy to do. For example, file 50-cloud-init.yaml is easily backed up by just making a copy of the file with a change to the file name. Here is the command :
sudo cp 50-cloud-init.yaml 50-cloud-init.yaml-original
Cp is the copy command. Notice I added “-original” to the file name.
So now we should have two files in the directory :
1) 50-cloud-init.yaml – the working configuration file
2) 50-cloud-init.yaml-original – a backup of the original configuration file.
You can verify by using the vdir command, which lists the contents of the directory we are in.
Making a backup of the original backup file could save you some pain if you need to figure out how the server was originally configured.
Changing a Static IP Address
This is a two step process assuming your server is already configured with a static IP.
Step 1 :
Issue the command “sudo vi /etc/netplan/50-cloud-init.yaml” on the command line. Replace your file’s name for my file’s name.
You can make several changes to this file:
network:
    ethernets:
        enp0s3:
            addresses:
            - 192.168.1.80/24
            nameservers:
                addresses:
                - 8.8.8.8
                - 8.8.4.4
                search: []
            routes:
            -   to: default
                via: 192.168.1.1
    version: 2
1) Change the IP of the server by replacing the current IP address. This file shows an IP address of 192.168.1.80. Change it to what you would like it to be.
2) Change the name servers. This file shows Google’s name servers of 8.8.8.8 and 8.8.4.4. You can change them to other name server values.
3) Change the gateway which in this file is 192.168.1.1. Change it to another gateway if need be.
4) The subnet can be modified by editing the subnet that is part of the IP address. In this case the IP along with the subnet is 192.168.1.80/24. Notice the “/24”. That is the subnet for this configuration. You can modify the “/24” to increase or decrease the number of IP addresses that are available in the configured network.
Step 2 :
In the static configuration file “/etc/netplan/50-cloud-init.yaml” you will notice that there is some notes. These notes must be followed. They are listed as follows:
# This file is generated from information provided by the datasource.  Changes
# to it will not persist across an instance reboot.  To disable cloud-init's
# network configuration capabilities, write a file
# /etc/cloud/cloud.cfg.d/99-disable-network-config.cfg with the following:
# network: {config: disabled}
The notes say we must create a file “/etc/cloud/cloud.cfg.d/99-disable-network-config.cfg” and write the following into it: “network: {config: disabled}”, in the folder /etc/cloud/cloud.cfg.d/.
This can be accomplished by issuing the command “sudo vi /etc/cloud/cloud.cfg.d/99-disable-network-config.cfg”.
If the file is empty add the line: “network: {config: disabled}” and save it.
If you are using vi press the “i” key to place vi into insert mode, then copy and paste the line. Then press the escape key to move vi into command mode. Then press the colon key followed by “wq”. Then press the enter key.
The “wp” are for write and quite.
At this point issue the command “sudo netplan try”. If there are no errors you can issue “sudo netplan apply”.
If there are no errors you have success.
Potential Error That Might Occur During This Process
If your configuration file is not indented properly, you will get an error.
Here is what it might look like :
“Error in network definition: expected mapping (check indentation)
ethernets:”
The error tells you where the error is located. In this case, it is an indentation error.
Edit the configuration file and verify it is configured correctly.
Then issue the command “sudo netplan try”. If all is correct you might see a message that the configuration will automatically be accepted.
If not issue the command “sudo netplan apply”.
Verifying the IP Has Been Changed
To verify the configuration has taken place you can issue the commands “ip a” and/or “ifconfig”.
I would recommend that you power off your server and then power it back on and then verify the IP is correct.
Conclusion
In this article, we learn how to clone an existing guest on VirtualBox. We learn how to give the clone a unique MAC address and a unique IP address. We learn what an IP is, why it is important, and how to manage IP addresses on an Ubuntu 24.04LTS Server. We learn how to identify a static IP address configuration and a dynamic IP address configuration. Then we learn how to change the static IP from one address to another. We learn the Linux commands “ip a”, “ifconfig” and learn a bit about the Linux editor vi. And finally, we learn it is a good practice to back up a configuration file before we modify it.